Engine Startup Preload Screens
Up to four different engine preloading screens may be shown when an Unreal Engine game launches—one for each engine startup phase. While these screens are being displayed, the engine is initializing and the game has not even started loading yet.
Most developers find the default startup movie player perfectly acceptable, but a custom engine preloading screen makes sense if you’re looking for more control over the startup experience. For example, you may want to display a loading throbber or a series of images instead of movies at startup.
Read on to learn more about each engine startup phase and how to customize all four engine preloading screens.
Preload Screens Sequence

Platform splash screen
The game displays a small splash screen on desktop platforms (Windows, MacOS and Linux).
This is displayed under the following conditions:
- A splash image is selected for the platform in Project Settings (e.g., Platforms > Windows > Splash).
- It’s running on a desktop OS.
- It’s not running as a dedicated server or commandlet.
- The game was not launched with the
-nosplashcommandline argument.
At this point, the engine has not even started loading yet. This means the splash image must exist outside the Unreal File System (UFS) as a standalone file in the packaged build, i.e., <Game>/Content/Splash/Splash.bmp.
The platform splash screen does not use Slate. It runs on its own thread with its own window created via platform-specific hooks. It’s as low-level as it gets. The game window has not been created yet.
Using a BMP image
The Unreal Automation Tool (UAT) specifically looks for a bitmap file named Splash.bmp to copy when packaging. This means bitmap is the recommended image format to use for the splash screen. When you use a bitmap, the splash screen “just works” in a packaged build.
Using a PNG or JPEG image
To use PNG or JPEG, you must manually stage the image in Project Settings or DefaultGame.ini.
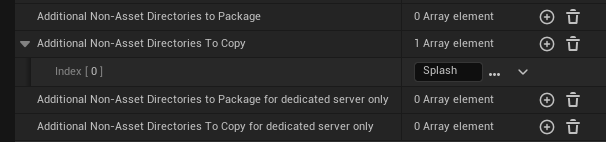
The “Additional Non-Asset Directories To Copy” setting is found under Project > Packaging. Make sure Splash is included in this setting.
Alternatively, add the following to DefaultGame.ini:
[/Script/GameFeatures.GameFeaturesSubsystemSettings]
+DirectoriesToAlwaysStageAsNonUFS=(Path="Splash")
A word of caution: all files under the /Content/Splash/ directory will be copied for distribution. As far as I know, you cannot stage individual files via config unless you extend the UAT. Really, just use a bitmap to make things easier on yourself.
Engine preloading screens
After the platform splash screen, the game window is created. All screens from here on are platform-independent and have access to the game’s Slate application.
As the engine goes through each initialization stage, more Unreal Engine features become available to use in your custom preload screens.
| Preload Screen Type | Module Load Phase | Available Features |
|---|---|---|
CustomSplashScreen |
PostSplashScreen |
Slate & Localization |
EarlyStartupScreen |
PreEarlyLoadingScreen |
Slate, Localization, & Config (raw access via GConfig) |
EngineLoadingScreen |
PreLoadingScreen |
Slate, Localization, Config (via UCLASS and UPROPERTY specifiers), & UObject
|
Creating a preload screen
FPreLoadScreenBase is used for all Slate-based engine preloading screens.
Preload screens of all types should override Init, GetPreLoadScreenType, and GetWidget.
// .h

#pragma once

#include "PreLoadScreenBase.h"

class FMyCustomPreloadScreen : public FPreLoadScreenBase
{
public:
    virtual void Init() override;
    virtual void RenderTick(float DeltaTime) override;

    virtual EPreLoadScreenTypes GetPreLoadScreenType() const override
    {
        // Change this to indicate which phase you want this screen to be created in.
        return EPreLoadScreenTypes::EarlyStartupScreen;
    }

    virtual TSharedPtr<SWidget> GetWidget() override
    {
        return Widget;
    }

protected:
    TSharedPtr<SWidget> Widget;
};
// .cpp

#include "CustomPreLoadScreen.h"

void FMyCustomPreloadScreen::Init()
{
    // Read from config here if needed.
    // EarlyStartupScreen - use GConfig to read raw values.
    // EngineLoadingScreen - UObjects like UDeveloperSettings may be used.

    // Create your Slate widget here.
    Widget = SNew(SOverlay);
}

void FMyCustomPreloadScreen::RenderTick(float DeltaTime)
{
    // This is executed on the render thread. Use it to animate the widget if desired.
}
For CustomSplashScreen and EarlyStartupScreen types, the preload screen is visible for as long GetWidget() returns a valid Slate widget. For EngineLoadingScreen, it is visible until bIsEngineLoadingFinished is true. Override IsDone() to customize this behavior to support skipping or some other custom logic.
The custom preload screen must be registered in the module.
// Module.cpp

#include "MyCustomPreloadScreen.h"
#include "PreLoadScreenManager.h"

class FMyCustomPreloadScreenModule : public IModuleInterface
{
public:
    virtual void StartupModule() override;

private:
    TSharedPtr<FMyCustomPreloadScreen> MyCustomPreloadScreen;

    void OnPreLoadScreenManagerCleanUp();
};

void FMyCustomPreloadScreenModule::StartupModule()
{
    // Preload screens will never be displayed on a dedicated server or commandlet.
    if (IsRunningDedicatedServer() || IsRunningCommandlet())
    {
        return;
    }

    // There's also no point in doing anything while in the editor or in headless mode.
    if (GIsEditor || !FApp::CanEverRender() || !FPreLoadScreenManager::Get())
    {
        return;
    }

    if (FPreLoadScreenManager* PreLoadScreenManager = FPreLoadScreenManager::Get())
    {
        MyCustomPreloadScreen = MakeShared<FMyCustomPreloadScreen>();
        MyCustomPreloadScreen->Init();

        PreLoadScreenManager->RegisterPreLoadScreen(MyCustomPreloadScreen);

        PreLoadScreenManager->OnPreLoadScreenManagerCleanUp.AddRaw(
            this, &FMyCustomPreloadScreenModule::OnPreLoadScreenManagerCleanUp);
    }
}

void FMyCustomPreloadScreenModule::OnPreLoadScreenManagerCleanUp()
{
    MyCustomPreloadScreen.Reset();
}

IMPLEMENT_MODULE(FMyCustomPreloadScreenModule, MyCustomPreloadScreen)
Finally, in .uplugin or .uproject, make sure the module uses the correct loading phase. Refer to the table above to determine which loading phase to use.
{
    "Modules": [
        {
            "Name": "MyCustomPreloadScreen",
            "Type": "ClientOnlyNoCommandlet",
            "LoadingPhase": "PreEarlyLoadingScreen"
        }
    ]
}
Custom splash screen
This is the second screen that may be displayed under the following conditions:
- It’s not running as a dedicated server or commandlet.
- The game was not launched with the
-noloadingscreencommandline argument. - A module with the
PostSplashScreenload phase contains aFPreLoadScreenBasesubclass with the type set toCustomSplashScreenand registered withFPreLoadScreenManager.
Unlike the platform splash screen, this screen will appear on all platforms and runs on the Slate render thread. In practice, there’s not really a good reason to have a custom splash screen. It will block the engine from loading any further while it’s visible (unless you create a new thread but that’s beyond the scope of this article). Not to mention the time between the custom splash screen and the early startup screen is insignificant.
Early startup screen
This is the third screen that’s displayed under the following conditions:
- There are no startup movies to play OR the platform does not support early playback.
- It’s not running as a dedicated server or commandlet.
- The game was not launched with the
-noloadingscreencommandline argument. - A module with the
PreEarlyLoadingScreenload phase contains aFPreLoadScreenBasesubclass with the type set toEarlyStartupScreenand registered withFPreLoadScreenManager.
A custom early startup screen is displayed if, and only if, there are no startup movies or the platform doesn’t support early playback of startup movies. As far as I can tell, early playback is supported on Android, iOS, and Windows.
Since UObject is not available in this phase, you must use GConfig to read and parse config values manually.
Engine loading screen
This is the final engine preloading screen that’s displayed under the following conditions:
- There are no startup movies to play.
- It’s not running as a dedicated server or commandlet.
- The game was not launched with the
-noloadingscreencommandline argument. - A module with the
PreLoadingScreenload phase contains aFPreLoadScreenBasesubclass with the type set toEngineLoadingScreenand registered withFPreLoadScreenManager.
This is the easiest preload screen to implement because you have access to most engine features at this point, especially UObject. Keep in mind that UGameInstance, UWorld, and other game-related singletons do not exist until after the engine loading screen.
If you plan on creating a custom engine loading screen that uses a background color other than black, then you probably would want to also create an early startup screen to set the background color of the window onwards from the first frame. This produces a seamless transition to the engine loading screen. If you don’t do this, then the game window will be black for a brief moment at launch, which may or may not be acceptable to you.